Craft stampers, card maker of the year award 2010

Craft stampers, card maker of the year award 2010

maandag 24 juli 2023

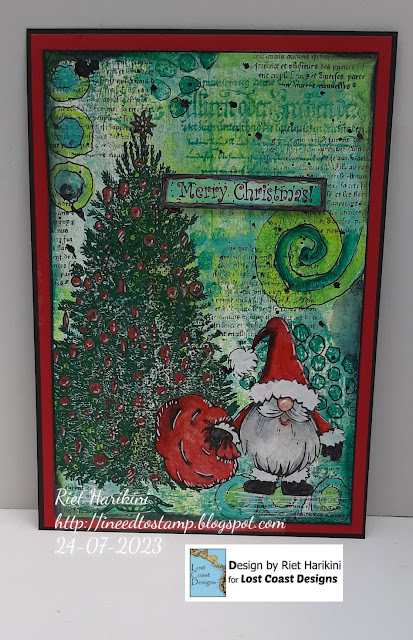
Christmas in July challenge at Lost Coast designs

 Hello stampers, today my entry for the Christmas in July challenge.
I have a description for you here how to make the card.


What I used:
Carmen's Veranda - Christmas Tree,
Lost Coast designs-Gnome santa with toys,
Lost Coast Designs - Brush Strokes,
Lost Coast designs - pieces of calligraphy,
Lost Coast designs - Party words.

Other materials:
americana acrylic paint,
blue grass green,
Bahama blue.
White 
Stazon Jet black, Forest green.
Color pencils, I used Derwent Inktense.
Waterproof black fineliner.
Posca white marker.
Black paint to splash with.
Ink/paint roller.
Coloring pencils in the colors of the background
 and red and black for the santa.
I started by roling out the paint.
I used all three colors starting with the lightest.
If you find the colors too hard you can go over it with some white paint.
Stamp the christmas tree with the stazon Forest Green.
And color the ornaments red.

And then I got so absorbed in my work that I forgot to take any further pictures.
But we'll just continue with the explanation.
With the brush strokes sheet we stamp the background here and there.
I applied some acrylic paint with a sponge on the stamps.
This way you stay in the same colors.
Give some more color accents with the pencils.
I stamped the small text of the Pieces of calligraphy with black stazon.
I applied the same colors of paint on a strip of paper.
With stazon black the Merry Christmas of the party words
sheet stamped on the strip.
Scribbled around the stamps with a black fineliner.
Make some splashes with some black paint.
Stamp the gnome on thin paper with stazon black and color it with the pencils.
Cut it out and glue it on.
Now glue the text on top and matte the card with red and black.
Give some white accents with the white posca pen.
And that's it for this time.
Will you also join the challenge?
You have a chance to win stamps and you can also participate with other stamp brands.
As long as you stamp on your project.
Click here for the challenge.

This card is participating in these challenges.


Christmas kickstart challenge #76


zaterdag 15 juli 2023

It's Christmas in July at Lost Coast designs and Carmen's Veranda stamps.

The new challenge at Lost Coast designs/Carmens Veranda stamps is
Christmas in july.

Sometimes I really don't know what to make.
In that case I take a good look around me.
Sometimes it is an object and sometimes a color that inspires me.
Well today I was eating delicious sweets with a somewhat strange color.
And yes, there it came, 
I had this translucent Christmas ball lying around for so long, 
so now I made something with it, in the color of the sweets.
At LCD/CV it's Christmas in July challenge, so I made it for the challenge.

Used materials:
The beautiful LCD stamps.
A die with holly leaves.
Colorbox chalk Creamy brown.
Stazon Timber brown.
Distress ink Walnutstain.
Distress ink Pumice stone.
A small star punch.
Gold glitter.
Transparent christmas ball.
Some ribbons.

Start by drawing a circle of the ball.
Cut this out, on the inside of the pencil line.
Check first if it fits properly.


Stamp the praying angel with the colorbox ink.


Apply the ink all around with an ink blender and the Distressink pumice stone.


Now take the smallest stamp from the sheet Pieces of Calligraphy.
This one has super small letters and that's what it takes to fill the little empty spaces.
Stamp with the Distress ink Pumice stone.


Because I wanted to let the Christmas Miracle pop,
I stamped it with Stazon Timber Brown.


Apply the ink all around with an ink blender and the Distressink Walnut stain.


Die cut the holly branch.
Color it the same as the circle with the inblender.
Apply some gold glitter to the leaves and berries.
Apply foam tape to the holly branch and stick it at the bottom of the circle.

Punch some small stars.
Apply gold glitter on top and glue the stars around the angel.


Now you can assemble the bauble.
I covered the seam with a gold ribbon and made a bow on it.
But you can decorate according to your own ideas.
I hope you enjoyed it, and feel free to join the challenge at Lost Coast designs. 
You can even participate with other brands, as long as there is stamping.
Good luck and see you next time.


I have entered this christmas baulb in this challenge:

Christmas with the cuties. Something with fur or feathers.
The angel wings are of feathers


Christmas kickstart challenge, Ginger bread treets.
I was thinking, my angel baulb has a gingerbread color.


donderdag 6 juli 2023

Challenge 170 at lost Coast Designs. Red, White and Blue.

 Hi there stamp lovers,
What fun to make something in red, white and blue.
And what a great challenge.
They are of course the colors of the 4th of July holiday in the USA.
I made this tag with that in mind.

What I used for this tag.

Rosettes die.
border die with stars.
Star punches,
Stencil with sun rays.

Distressink,
Chipped sapphire,
Fired brick,
Antique linen,
Vintage photo,
Walnut stain.

Aqua markers blue, orange and red.
Dark blue and red cardstock
A blank tag.
Red, white and blue ribbon.
Foam tape.

How to make this tag.
I started with Megan's Christmas Bird.
Using a stamping platform and the aqua markers, I stamped the bird.
I cut it out and set it aside to dry.

I sponged the tag with the 3 distressink colors.

Then sprayed it wet with water and dryed  it with the heattool.
 
I did the same with a small strip of paper,
 and stamped with the Chipped sapphire `Let´s Celebrate`
from the Party words sheet.

With a sun rays stencil you sponge the distressink Fired brick on the tag.

And with a stamp from the Pieces of Calligraphy set
 and Chipped sapphire you make 3x a print.


Make a puddle of ink and water and run the rosette strip trough it.
One with red and one with blue.
Let it dry.

Blend some walnut stain on the edges.
Fold the rosette and glue a star in the middle of it.

Cut the dark blue cardstock slightly larger than the tag.
But a lot longer on the bottem so that you have the space to make a border with a star die.
The last you cut is the top of the tag in the blue cardstock.
Now we are going to assemble the tag.
I adhered the bird and the banner with foam tape.
With punches I made stars in red, white and blue.
For the rosettes and here and there on the tag.
Don't forget to put a star on the bird's hat.
This is how we make the holly on the hat disappear.
Now mat the tag with the red cardboard.
A red, white and blue ribbon through it and the tag is ready.

I hope you wil join us and show what you made with,
Red, White an Blue.