Craft stampers, card maker of the year award 2010

Craft stampers, card maker of the year award 2010
Posts tonen met het label Juwelry. Alle posts tonen

donderdag 16 oktober 2025

31 Days of halloween challenge at Lost Coast designs/Carmens veranda stamps blog.


It's already the 16th day of Halloween Challenge month.
For my contribution, I made a choker necklace.

I cut a bat from a sheet of shrink plastic.
I drew the bat using a stencil from Angies Happy Hobby.
She has the most amazing stencils with mask.

I stamped the Frida skull with Stazon Jet Black and colored it in with markers.
Then I put on a mask of the fridah skull and stamped the spider web with resist fluid.
Let everything dry completely and then sponge it with Distress Oxide Hickory Smoke.
The edges were sponged with Distress Oxide Black Soot.
Once everything is thoroughly dried, you can heat and shrink the shrink plastic.
You can make the choker using your own imagination or buy it ready-made.
I hope you enjoyed it.
Maybe you've made something for Halloween too? 
Show us and you could win new stamps.
Join us on the LCD blog.


zaterdag 23 oktober 2021

31 Days of Halloween. Day 23, Halloween necklace.

Hello everybody, 
I made a Halloween necklace for Halloween.
Here is what I used and how I made it.
I used:
I would like to point out that,
 these stamps are very large which makes them very suitable for shrink foil.
If the stamp is too small, a small image will remain after shrinking.
Which you can barely see.


                                       Shrink plastic, in the Netherlands its cald "krimpie Dinkie".
Black Stazon
Color pencils or markers.
We r memory keepers- Multi hole punch
Metal chain
metal rings
2 small pliers
Sissors
pencil for drawing.
Heattool

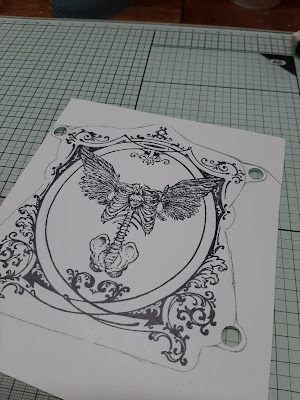
I started by printing the stamp with stazon and letting it dry well.
With a pencil I drew a shape around the print and cut it out.
Be very careful to punch the holes first.
You have to cut this as shown in the photo.
This is where the rings will hang later.

Erase all pencil lines after cutting.
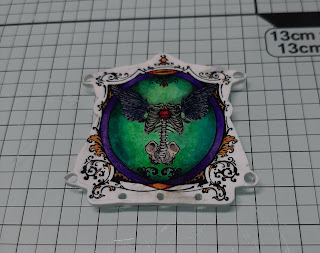
Now you can color the image.
Do this with light colors and fairly thin.
The melting will make the color much darker.

After heating it with the heattool it looks like this.
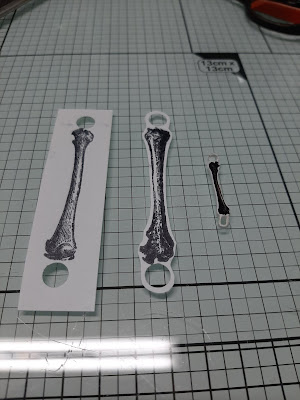
Now we repeat all this again with 4 x a bone of the large skeleton.
And dont forget to punch the wholes.

I colored the bones with a sand color.

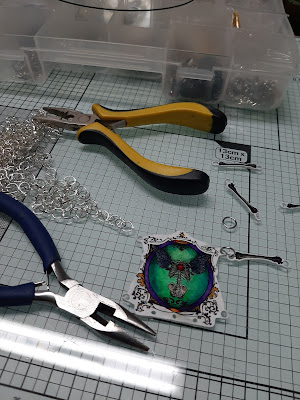
Now we attach the rings and the chain to it.
And you are done.
Hope you had fun with this tutorial.

It would be great if you also join our Halloween challenge. 
Make a card, tag, mixed media project or whatever you can think of. 
If only it has some stamping on it. 
 You don't even have to use the Lost Coast stamps,
Other brands are also allowed.
So come and take a look at our challenge blog and join us.
You maybe the winner of new rubber stamps.


This necklace joins the challenge of,

woensdag 10 maart 2021

#117 Mini me, Frida skull necklace. Challenge Lost coast designs.


                                                      Hello, stamp fiends, Riet here.

What a great challenge Gail (teamleader lost coast designs) has given us.
Mini me, love it.
This challenge really sparked my imagination. 
 I love shrink foil, so that was the solution to make something small.
And this is the result, a Frida skull necklace.
Hope you enjoy it.

This is what you need to make the necklace.
White shrink foil.
Markers or pencils
Stazon Jet black

First we start with stamping the Frida skull.
Color it, keep in mind that you keep the colors light,
When the foil is heatted and shrinks the colors will be much darker.
Cut it out and heat it in oven or with the heattool.
Read the instructions on the shrink foil package.
Next step is to take a die and cut it out on your machine.
Dont have a die cut machine? 
No worry, you can cut a form with a sissors.

Dont forget to make the holes, make them big becouse of the shrinking.
Mine where as big as a pencil.

Stamp with the stazon the fourth demension stamp.

Now wait till the ink is completely dry.
When not dry it can smug when you shrink it.
Now you glue the skull on the background


Attach a few metal rings through the holes, like on the picture.


continue to assemble the necklace as shown on the picture.

I hope you have as much fun with this necklage as I had.
Thanks for reading my post, and have fun with making your own juwelry.

Dont forget to show your minime on the LCD blog in the challenge.
You have a chance to win some rubberstamps.
So please join us at