Craft stampers, card maker of the year award 2010

Craft stampers, card maker of the year award 2010

woensdag 27 oktober 2021

#131- Day 27, 31 days of Halloween, Hanging of the raven.

                                                             Hi there, kreepy monsters.
                                                              Are you scared yet????


Today this card is for the Lost Coast Designs Halloween challenge.
You can still participate, it runs until 31.

I started with the door and window stamp set.
I stamped these stamps with versamark and clear embossing powder.
I colored the windows with Brusho soft yellow.
The rest is done with Brusho blue, green and black.
When everything was dry, I removed the ebossing powder with an iron and paper towels.
With stazon timber brown I stamped the winged skeleton on paper and cut it out.
I stamped the goth raven 3 times with stazon midnight blue.
I once cut out the head and once the top half of the raven, and once a whole raven.
Then I colored them with water based markers.
I made a hanging loop from a piece of string,
 and put some brown stazon on it to make it look a bit older and dirtier.
Now you can put everything together like on the card,
or at your own taste.
On the heart I glued a big red stone in the shape of a heart.


You can still participate in the Halloween challenge.
And you can participate with all stamp brands.
You have a chance to win rubber stamps.
So, read the rules and join the fun.
The team would really like that.


This card is entered in the challenge of:

zaterdag 23 oktober 2021

31 Days of Halloween. Day 23, Halloween necklace.

Hello everybody, 
I made a Halloween necklace for Halloween.
Here is what I used and how I made it.
I used:
I would like to point out that,
 these stamps are very large which makes them very suitable for shrink foil.
If the stamp is too small, a small image will remain after shrinking.
Which you can barely see.


                                       Shrink plastic, in the Netherlands its cald "krimpie Dinkie".
Black Stazon
Color pencils or markers.
We r memory keepers- Multi hole punch
Metal chain
metal rings
2 small pliers
Sissors
pencil for drawing.
Heattool

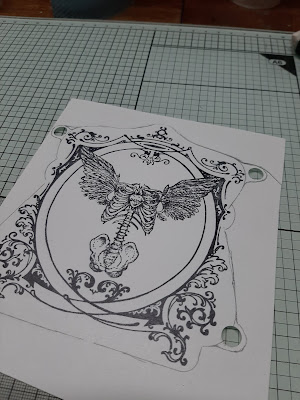
I started by printing the stamp with stazon and letting it dry well.
With a pencil I drew a shape around the print and cut it out.
Be very careful to punch the holes first.
You have to cut this as shown in the photo.
This is where the rings will hang later.

Erase all pencil lines after cutting.
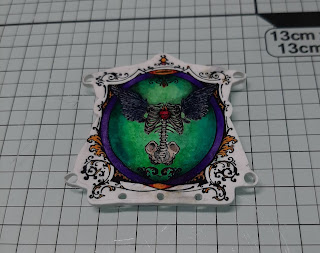
Now you can color the image.
Do this with light colors and fairly thin.
The melting will make the color much darker.

After heating it with the heattool it looks like this.
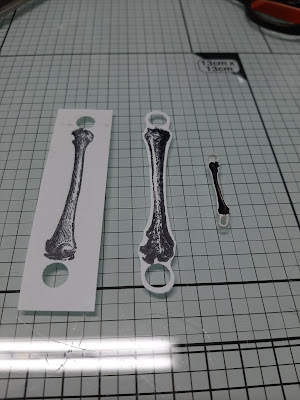
Now we repeat all this again with 4 x a bone of the large skeleton.
And dont forget to punch the wholes.

I colored the bones with a sand color.

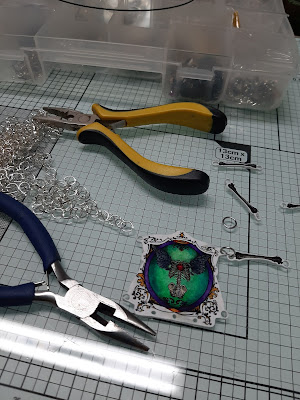
Now we attach the rings and the chain to it.
And you are done.
Hope you had fun with this tutorial.

It would be great if you also join our Halloween challenge. 
Make a card, tag, mixed media project or whatever you can think of. 
If only it has some stamping on it. 
 You don't even have to use the Lost Coast stamps,
Other brands are also allowed.
So come and take a look at our challenge blog and join us.
You maybe the winner of new rubber stamps.


This necklace joins the challenge of,

dinsdag 12 oktober 2021

31 Day's of Halloween, Day 12, Crows

Welcome back to Lost Coast Portal to Creativity where Lost Coast Designs and Carmen's Veranda collide to bring you twice the inspiration and double the fun!
Hello everyone,
No tutorial today, I forgot to take the pictures.
But I'll give you a brief explanation.

What did I use:
distress oxide,
dusty concord
crackling campfire
spiced marmalade
musterd seed
A waterproof black ink (Stazon)
color pencils
mask tape
white gel pen

First I stamped and masked the trees.
Then I sponged the entire card with musterd seed.
Then you stick a circle of masking tape, this will be the moon.
Then you will apply the colors.
From below you leave a border yellow,
then spiced marmalade, then crackling campfire.
And finally dusty concord.
Spray a light mist of water to get some spots.
Remove the moon mask, and apply some spiced marmalade on the moon with a small sponge.
Remove the trees mask.
Stamp the 4 ravens on a paper and color them.
Cut them out without the moon and lower loose feather.
Stamp the 4 ravens on the card with stazon but without the moon and the feather at the bottom of the stamp.
Glue the cut out 4 ravens to the stamp imprint on the card.
Give it some shade with a black pencil.
Give the ravens and feathers some accents with a white gel pen.

I hope you liked it.
Come and participate in this super fun challenge.
Follow the link and join in the fun, then you have a chance to win new stamps.
Good luck and see you next time.

This card is entered in the challenge of:

zaterdag 9 oktober 2021

# 131 31 Day's of Halloween. Day 9, Tutorial

Hello  my stamping friends.
Good (spooky)day to all of you.
Are you getting the kreeps already???
Well I am!!!


This time I made a tag.
And this is what I used:

Distressink 
squeezed lemonade,
shabby shutters,
black soot,
dusty concord,
crackling campfire.
Distress oxide 
Spiced marmalade.

Versafine onyx black

Stencil From Dutch doobadoo wyber.
 white gellpen
Bat die cuts 

This is how I made the tag.

First I colored the tag with water drops using squeezed lemonade and shabby shutters.
Let the tag dry well and then sponge with the stencil and crackling campfire here and there.
Stamp the spider web over it with versafine black.
Sponge the side's with distressink Dusty concord and black soot.
Take a strip of paper and make it orange with distress oxide spiced marmalade.
Immediately put some water drops on it and absorb the color with a paper towel.
This way you get nice light spots.
Stamp the skeleton with Versafine onyx black.
Give the skeleton some highlights with the white gellpen.
Now die cut the bats and give them orange glitter eyes.
Assemble the tag and you're done.

We would love to see your work too.
So join us in our 31 Days of Halloween challenge.
It ends on October 31.
Make something fun with the Halloween theme.
It must be stamped on, but the stamps can also be from other brands.
You have a chance to win stamps of your choice, isn't that nice?

This tag joins the challenge of,


maandag 4 oktober 2021

#131 31 days of Halloween, witches shoe Tutorial.

 Hi there, Riet here.
Halloween is a real American celebration. 
But in recent years you see Halloween more and more in other countries. 
I think it's because of the internet and movies. 
It's just so much fun dressing up and escaping the daily things of life. 
But I love how the Americans celebrate it, all those beautiful decorations, amazing. 
So I thought, I will make something that can be used as decoration. 
And after a scavenger hunt on Pinterest, I saw the cute witch shoes. 
 I had bought a template of a shoe years ago and never used it. 
So now is a great opportunity to use it.


This is a list of the thigns I used.
Distress Oxide:
spiced marmalade
Seedless Preservers
distress ink:
spiced marmalade
Seedless preservers
twisted lemon
antique linen
Mustard seed
Distress micro glaze
Versafine onyx black
some ribbons
Plastic mini pumpkins
decorations
dry moss
Toothpics
black paint or paint marker

This is how I made it.

I started with drawing and cutting the template.

On the toe part of the shoe I stamped the fourth dimension background with Versafine onyx black.
When it is dry, sponge it with Distress antique linen.

Sponge the sides of the nose with Distress Ink Spiced marmalade


The sides and back of the shoe are stamped with Spiderweb stamp,
 and Distress micro glaze.
Then sponged with Distressink Twisted citron.
And the edges with Distressink Seedles preserves.


Sponge the insides of the shoe with Distress Oxide spiced marmalade .
With a sponge with a with open structure I made little spots with Distress oxide Seedles preserves.

Now it is time to glue the shoe together.

Whyle the shoe is drying,
we are going to stamp the witch and the moon with versafine black.
We color the stamps with distressink.
Take 2 toothpicks and paint them black.
Gleu them on the witch and moon.


We stamp the sentiment on paper and run it through a die cut machine.
If you don't have one, you can probably cut something out yourself.
Sponge the die cut with Distressink twisted citron and spiced marmalade.


Now we are going to finish the shoe with ribbons and embellishments.
You can decorate according to your own idea.


I hope you found it a nice tutorial.
Our team would love it if you would participate in our Halloween challenge.
This runs until the end of the month, and al brands are allowed to join.
You have a chance to win free rubberstamps.


This shoe joins the challenge of,

woensdag 22 september 2021

Challenge #130 All about the sentiments


 Hi there Riet here,
Today a card that is about the sentiment.
So I kept the environment of the text calm.
I used the Florish (large) with gold embossing powder.
A nice stamp that you can use in so many ways.
And of course my favorite sentiment from Carmen's Veranda, Child of the moon.
I started by applying 2 colors of ink to the background by running the card through ink with water.
Stamp the florish with versamark and sprinkle the print with the gold embossing powder.
Heat the embossing powder with the heat tool.
Colored the florish with pink and green watercolor paint and stamped the sentiment with a dark pink.
I hope you join our challenge, would be so much fun!
And you have a chance to win stamps.
Until next time and have fun stamping.


maandag 6 september 2021

#129 Movie Mania challenge at Lost Coast Designs

Hello everyone,
Today a card for the super fun Movie Mania challenge over at Lost Coast Designs
What a fun topic for a challenge.

Hello everyone, Riet here.
Today a card for the super fun Movie Mania challenge. 
What a fun topic for a challenge.
 I really like the old show movies and they are rarely shown on TV here in the Netherlands.
LCD has a stamp, "Showgirls" which always reminds me of those old movies.

I stamped this stamp 3 times and using paper masks.

After masking I sponged the background with Distress oxide Musterd seed. 


Then I went over it with a stencil and distress oxide Spiced marmalade.


After removing the masks I colored the showgirls in with water based markers, 


Tombow or Zig is fine.
I die-cut the stars and text from black glitter paper. 


And that was it, a wonderful piece of nostalgia from the old days.
Have lots of fun creating your Movie Mania art and join oure challenge here
(click on the banner)

dinsdag 24 augustus 2021

#128 Face On, challenge at lost Coast designs.

Today a card for the "face on" challenge.
This challenge runs until the end of the month, so plenty of time to participate.
And you have a chance to win rubber stamps.
If you want to participate, please read the rules first.
For this card i used the beautiful "Girl with curl"stamp.
I have done this background technique before.
 It's a simple technique with beautiful results, you can find the tutorial here.
Now its your turn to amaze us, the team would love to see your entry's.


maandag 16 augustus 2021

#128 challenge at Lost Coast designs, Face on.


Hello everyone, today this card for a challenge inspiration post.
The challenge this time is "Lets face it".

For this card I used a technique that I wrote a published article about years ago. 
Squeeze fresh flowers on paper. 
I love doing this technique, and make lots of prints so I have a lot of backgrounds. 
All you need is some flowers, paper and a die cut machine. 
You can also experiment yourself. 
For example, you can spray some ink or paint, or sprinkle some mica powders on it. 
You can probably come up with something yourself. 
Here is the tutorial for this card. 

You Need.....
Fresh cut flowers
Paper
Ink sprays
Papertowel
Die cut machiene
Tweezers
Brush
Black and white paint.

I always press the flowers between 2 sheets of paper.

When you run the paper through the machine, 
sometimes a lot of moisture comes out of the flowers. 
It is wise to keep quite a few sheets of paper towel handy. 
As soon as you see too much moisture coming out of the flowers, 
you should quickly blot it with the paper towel.

In this photo I had sprayed some glimmermist over the flowers and paper.  
Because you use 2 sheets of paper, you get a positive and negative print. 
And that gives very nice effects.

Now you have to peel of the flowers with the tweezers and brush.
Do this very carefully.
The paper has become wet and very prone to tearing.
And look what beautiful prints you have now.
And now the stamping,
I stamped the "Girl with a Curl" directly on to the floral print with black stazon.
Then colored her hair, eyes and mouth with some distress ink in the right color.
Also made some shadow around the stamp.
Splatter with some white and black paint fine splatters over the background.
Add some accents with a white gelpen and you're done.


You can of course make all kinds of designs and combinations.
Experiment and you will be amazed at what is possible.
But most importantly, have fun creating.
And dont forget to enter the challenge.
Maybe you will be oure next winner.


zondag 1 augustus 2021

Challenge #127 Neon Colors, over at Lost Coast designs.

 Hello everyone,
Today a new challenge starts at Lost Coast Designs.
Use neon colors, that's so much fun.
And you know what's so nice, you can participate with all stamp brands. 
But of course we prefer LCD or Carmens Veranda stamps.

This time I have a fairly easy card, so also suitable for the novice stamper.
I started with the fourth dimension and versamark Onyx Black.
Before printing the stamp, I wiped the outer edge with a cloth to get a faded outside.
Then stamp the cat on the center line of the background stamp.
Stamp the cat again on a piece of paper.
Color the cat with neon colors and glue it on the cat in the background.
Draw a frame around the card with a fineliner.
Stamp the text 4 times around the card.
Glue the card to a black cardstock.
If you like it, we'd love to see you join the challenge.
And of course there is a prize to be won.
Please read theRULES first to avoid disappointment.
Good luck and maybe you'll win new rubber of your choice.


donderdag 22 juli 2021

#126 Challenge at Lost Coast Designs. Critters

Hello, today my contribution to the Lost Coast Designs challenge.
Subject is Critters. 
Well, when we think of critters we usually think of very sweet and nice creatures.
But of course there are other critters as well.
Just look at this card and you'll see what I mean.
This card was made with the LCD evil eye stamp.
The "devil in disguise" words are from the stamp of the same name.

The evil eye stamp is designed by Teri Sherman, and LCD has a lot of stamps by Teri's design.
Take some time and look at them on this page.
These stamps are so gorgeus, I just love them.

I used for this card.....
Distress Oxide Black Soot, Rustic Wilderness andTwisted Citron.
the cobweb background is stamped with Distress Micro Glaze.
The speckles that you see in the background and the card are applied with a plastic sponge.
I colored the critter with Derwent coloursoft.
I really enjoyed making this card for this challenge.
The lost Coast Designs team is very curious about
your interpretation.
So come on and join in, you don't even have to use LCD stamps, you can join whatever stamp brand you want.
And did you know that you can win rubber?
That's always nice of course.
Well good luck with the challenge.